Are you struggling with persistent fatigue, unexplained aches, or a heavy feeling that rest just won’t fix? Many in Canada find that modern medicine alone doesn’t always address the root of metabolic sluggishness or spiritual exhaustion. Islamic cupping therapy, known as Hijama (Islamic wet cupping), offers a solution through Tib-e-Nabawi (Prophetic Medicine).
By targeting specific wet cupping points, this practice draws out stagnant blood and toxins, providing a much-needed reset for Muslims seeking cupping therapy to restore their natural vitality and health.
A common point of confusion for many is: Is Hijama different from cupping? While both use suction, cupping in Islam focuses on the “wet” method, which involves minor surface scratches to physically remove impurities.
Performed with a clear Niyyah (intention) for healing, Hijama is a spiritual and physical purification process. It goes beyond simple muscle relief, aiming to balance the body’s internal systems and provide lasting “Shifa” through a practice that is as much about the soul as it is about the skin.
The Religious Significance: Cupping in Islam
For believers, the practice of Hijama is not just a physical remedy but a profound act of devotion. Rooted in the traditions of the Prophet Muhammad (PBUH), cupping in Islam is regarded as one of the most effective ways to maintain a healthy body and a clear mind.
By incorporating this therapy into your lifestyle, you are engaging in a healing method that has been divinely recommended and historically proven to provide relief to those suffering from various ailments.
Cupping Benefits Islam: Wisdom from the Hadith
The benefits of cupping offered by Islam are frequently highlighted in authentic narrations (Hadith). The Prophet (PBUH) once said, “Healing is in three things: a draught of honey, the incision of a cupper, and cauterization with fire, but I forbid my followers to use cauterization.”
This direct endorsement establishes Hijama as a premier form of treatment. Furthermore, it is narrated that during the Night Journey (Isra’ wal-Mi’raj), the angels told the Prophet (PBUH), “O Muhammad! Order your Ummah to practice cupping.”
These references emphasize that Islamic hijama is a holistic mercy, designed to restore the body’s natural state of balance and health.
The Best Times for Cupping Muslim Practices (Sunnah Days)
To maximize the Islamic cupping benefits, practitioners often follow the lunar calendar. It is traditionally recommended that a Muslim schedule their appointments on the “Sunnah Days,” specifically the 17th, 19th, and 21st of the Islamic lunar month.
It is believed that during these days, the body’s fluids are at their peak, making the extraction of toxins more efficient. While Hijama can be performed at any time for urgent medical needs, following this specific timing is a beautiful way to align your healing journey with the Prophetic tradition.
The benefit of cupping therapy is most profound when combined with this mindful timing and a sincere intention for recovery.
Mapping the Sunnah Points: Al-Kahil and Al-Akhda’ain
The most vital wet cupping points are those frequently used by the Prophet (PBUH). The primary point is known as Al-Kahil, located at the base of the neck, specifically on the seventh cervical vertebra (C7).
This point is considered a crossroads for the nervous system and is often used for cupping therapy on the neck to relieve tension and improve systemic health.
Additionally, the Al-Akhda’ain refers to two points located on the sides of the neck, just behind the ears. These points are essential for those seeking cupping for migraine relief or relief from tension headaches.
Targeting these specific areas helps clear the pathways to the head and upper body, ensuring that the “Sunnah points” provide maximum therapeutic impact.
Wet Cupping Points for Detoxification and Circulation
In Islamic hijama, the placement of cups is strategically designed to address blood stagnation. When toxins accumulate, blood flow becomes sluggish, leading to inflammation and lethargy.
By applying suction to designated areas across the shoulders and mid-back, practitioners can stimulate the lymphatic system and draw “heavy” blood to the surface.
This process is particularly effective for those dealing with musculoskeletal issues. For instance, focusing on the lumbar region provides targeted back pain cupping therapy, while placing cups lower on the body can provide the specific cupping therapy on the thighs, which is required for leg fatigue and improved lower-body circulation.
This deliberate placement ensures that every session acts as a physical “reset” for the circulatory system.
Islamic Cupping Benefits for Health and Spirit
The beauty of Islamic cupping therapy lies in its dual-action approach. It does not separate the physical body from the spiritual heart, acknowledging that when one suffers, the other is inevitably affected.
By seeking this treatment, you are following a path that restores equilibrium to your entire being, making it a cornerstone of a healthy lifestyle for Muslims who practice Hijama.
Physical Relief: Treating Migraines, Pain, and Toxicity
The physical cupping benefits Islam promotes are vast and scientifically fascinating. When the suction is applied, it draws deep-seated toxins and inflammatory markers out of the muscle tissue and into the superficial skin layers for removal. This process is a powerful remedy for those suffering from chronic conditions.
Many individuals find that regular sessions provide significant relief from debilitating migraines and tension-related discomfort. By clearing blood stasis and improving oxygen flow, Hijama acts as a natural analgesic.
Furthermore, for those looking for professional care, seeking Cupping services. ensures that the procedure is done safely, helping to flush the lymphatic system and revitalize the body’s internal defenses against everyday toxicity.
This method is often valued for its holistic approach, as it addresses underlying inflammation rather than symptoms alone, and it offers a more comprehensive approach to cupping therapy by addressing the root cause of inflammation.
Spiritual Wellness: Hijama as an Act of Ibadah (Worship)
Beyond the tangible physical results, cupping in Islam is a profound spiritual exercise. When a believer undergoes Hijama with the correct Niyyah (intention) to follow the Prophet’s (PBUH) guidance, the medical procedure is elevated to an act of Ibadah (worship).
It is a physical manifestation of trust in the “Tib-e-Nabawi” and a way to maintain the body, which is considered an Amanah (trust) from the Creator.
This spiritual connection often brings a sense of “Sakina” (tranquility) and mental clarity that goes beyond simple relaxation, providing a holistic hijama benefit for the soul.
By purifying the blood, practitioners believe the heart becomes more receptive to spiritual growth, making Islamic hijama a truly holistic experience. It serves as a reminder that seeking a cure is a virtuous pursuit, aligning one’s health journey with the divine wisdom of the Sunnah.
Safety, Frequency, and Guidelines
Ensuring a safe and effective experience with Islamic cupping therapy requires a balance between traditional wisdom and modern sanitary standards. Whether you are seeking relief from a specific ailment or simply following the Sunnah for general well-being, understanding the practicalities of the procedure helps you gain the maximum Islamic cupping benefits without unnecessary risk.
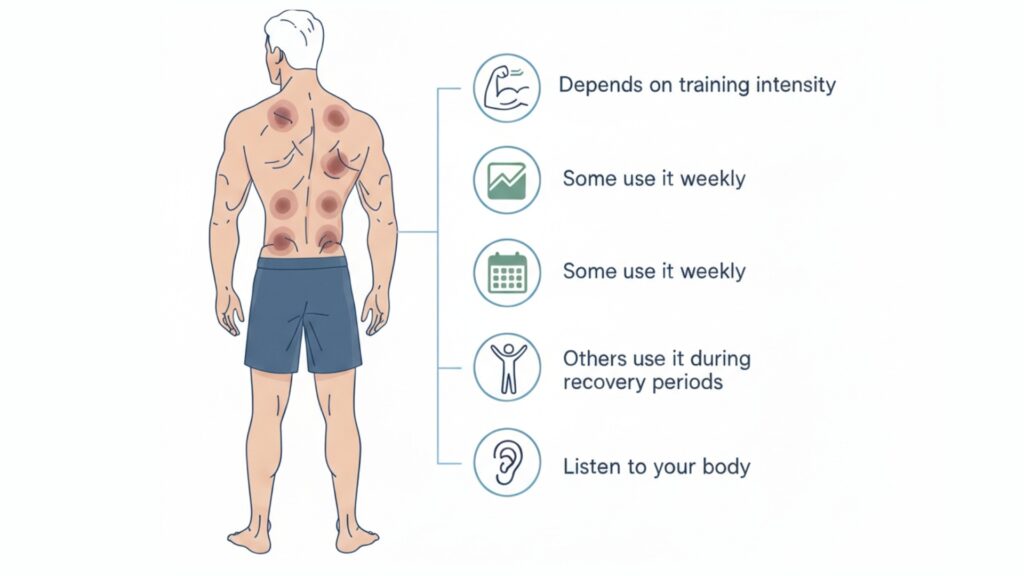
How Often Should You Do Cupping Hijama Therapy?
A common question for those new to the practice is: how often should you do cupping hijama therapy? The answer depends on your primary goal. For preventative health and maintaining the Sunnah, many practitioners recommend a session once every quarter, aligning with the recommended lunar days. This consistent routine helps manage systemic toxicity before it manifests as physical illness.
However, if you are using Islamic hijama to treat a chronic condition, such as metabolic issues or muscle tension, more frequent sessions might be necessary.
For example, those focusing on endocrine health might find that cupping therapy for thyroid support requires a more intensive initial schedule, such as once a month for three months, before moving to a maintenance phase. Always listen to your body’s recovery cues and consult with a certified therapist.
Hygiene and Safety in Modern Islamic Cupping Centers
In Canada and globally, the safety of cupping in Islam is governed by strict clinical standards. Because Hijama involves small incisions on wet cupping points, hygiene is the top priority. A professional center will always use single-use, sterilized equipment to prevent cross-contamination.
Before your session, ensure the practitioner explains the process and assesses your medical history. High-quality care ensures that the skin is properly prepared and treated post-procedure to encourage swift healing.
From specialized treatments like facial cupping therapy to deep-tissue work, the environment must be clinical, clean, and respectful of the spiritual nature of the practice.
Recovery and Results: What to Expect
After a session of Islamic cupping therapy, the body enters a crucial phase of renewal. While the immediate removal of toxins provides a sense of relief, the way you treat your body in the following 24 to 48 hours determines the longevity of the Islamic cupping benefits.
Most practitioners note that the “lightness” felt after Hijama is the result of improved blood flow and a decrease in the body’s inflammatory load.
Post-Hijama Care: Diet and Rest Recommendations
To support the detoxification process, a Muslim undergoing Hijama should prioritize hydration and gentle nutrition. It is traditionally recommended to avoid heavy dairy or red meat for at least 24 hours post-session, as the body should focus its energy on healing rather than complex digestion. Instead, opt for light meals, dates, and plenty of water to help flush out the released impurities.
Rest is equally vital. Avoid strenuous exercise or heavy lifting immediately after your treatment. If you have targeted specific areas, such as using cupping therapy on arms for strain relief, give those muscles time to recover without added stress. Proper rest ensures that the inflammatory response triggered by the cups remains focused on repairing tissues and boosting your immune system.
Healing Marks and Physical Lightness After Sessions
It is perfectly normal to see circular marks on the skin where the cups were placed. These are not bruises in the traditional sense; they are the result of blood being drawn to the surface.
In Islamic hijama, these marks usually fade within 3 to 7 days, depending on your body’s healing rate and the level of stagnation removed.
Many people report an immediate feeling of mental clarity and physical “weightlessness” once the session is over.
For those who have suffered from localized discomfort, such as upper back tension, using cupping therapy on neck points often results in a significant increase in range of motion and a reduction in pressure.
This physical lightness is a sign that the blood circulation has been restored, leaving you refreshed and spiritually uplifted.
Conclusion
Islamic cupping therapy is more than just an ancient medical treatment; it is a holistic bridge between physical health and spiritual devotion. By understanding what hijama and its roots in Tib-e-Nabawi are, we can appreciate it as a divine gift designed to purify our systems and restore balance.
From targeting specific wet cupping points for detoxification to seeking the spiritual rewards of a Sunnah practice, Hijama offers a path to wellness that modern medicine is only beginning to fully understand.
Whether you are seeking relief from chronic tension or simply want to revive your energy levels, following the Prophetic tradition provides a sense of peace and physical renewal.
This practice remains a good choice for those who prefer a natural, dry cupping vs wet cupping comparison to understand why the extraction of impurities is so vital for long-term health.
By choosing the right timing, maintaining proper hygiene, and setting a sincere intention, you can experience the profound “Shifa” that has benefited millions for centuries.
Take the next step in your healing journey by aligning your health routine with the wisdom of the Sunnah. Your body is an Amanah, treat it with the care and tradition it deserves.
FAQs
Are there specific prayers (Duas) recommended before or after Hijama?
There is no specific dua prescribed exclusively for Hijama. However, it is recommended to begin with Bismillah and make general supplications for healing and well-being. Many people also send blessings upon the Prophet ﷺ, as Hijama is a Sunnah practice.
Does having Hijama break your fast during Ramadan?
Scholars have differing opinions on whether Hijama breaks the fast. According to many contemporary scholars, Hijama does not invalidate the fast unless it causes extreme weakness. However, some schools of thought recommend avoiding it while fasting. To be safe, Hijama is often advised after iftar or before suhoor.
Is Islamic cupping (Hijama) therapy painful?
Hijama is generally not painful. Most people experience mild pressure or slight discomfort during the suction and small incisions. The sensation is brief and well-tolerated, and many individuals report feeling relaxed and relieved after the session.
Can women undergo Hijama during menstruation?
Yes, women can undergo Hijama during menstruation. However, it is usually recommended to avoid wet cupping at this time due to blood loss. Dry cupping is considered a safer option, and it’s best to consult a qualified Hijama practitioner for personalized advice.
What is the difference between wet cupping (Hijama) and blood donation?
Wet cupping removes stagnant or impure blood from specific points to promote healing, while blood donation involves removing healthy blood for transfusion purposes. Hijama is a therapeutic practice rooted in Sunnah, whereas blood donation is a medical and humanitarian procedure.